
Guide to a small logarithmic-scale Solar System
More detail is coming. For now, here is where to get the planets (and parts for making the optional acrylic display seen in the photos) -
The planet models can be ordered from Shapeways.
(Caution - if buying as a gift or if you have a deadline, check that your set can be manufactured and shipped to you in time.)
The acrylic display stand can be ordered from Ponoko. This is a two-step process:
First you purchase the plans, and this then enables you to order the parts cut and engraved from Ponoko.
The plans only need to be purchased once but manufacturing cost and shipping will probably add up to about $30.
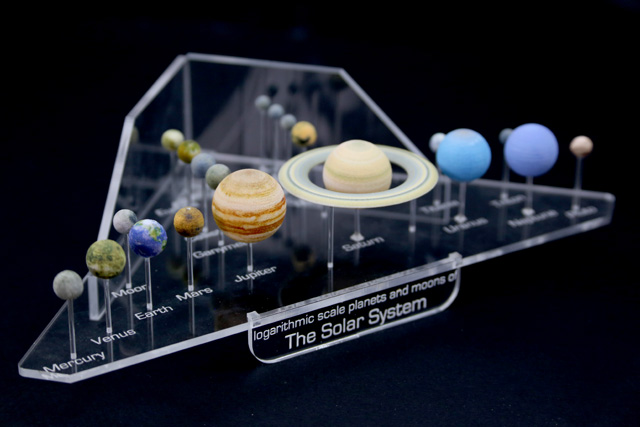
When the cut and etched acrylic arrives, you will need to remove the protective sheet from each side, including some tiny "islands" of sheet left in the engraved letters such as inside the letter "o" (I just scratch those little bits off with a fingernail - it doesn't seem to mark the acrylic). Then slot the pieces together, taking care not to force anything to breaking point.
The planets all come with a 1/16" mount hole in their south pole.
The display stand comes with matching 1/16" holes, labelled with each planet's name.
So you'll need some 1/16" rods to connect the two together...
In the photos, you can see I have used acrylic rods. You can get these here.
But you could also use aluminum rods like these.
Or brass rods like these. Etc.
(If you use metal rods, I recommend getting a modeller's pipe cutter like this. This will chamfer the cuts so they will go into the holes in the acrylic plate. If using acrylic rods, you can simply cut one end at a sharp angle with scissors to help get it into the hole, then trim it with side-cutters.)
I used regular super-glue to attach the rods to the planets, but don't use super-glue at the other end where the rod meets the display stand plate, because it can cloud nearby surfaces.
For the most part I didn't use any glue at all on the display stand - it is made with enough precision that the rods are held firmly by friction. However a couple were a little loose. For those I used a crystal-clear instant-setting UV-cured plastic. It doesn't bond to the acrylic strongly enough that you can't remove it easily and try again if you mess up, but it holds things in place, looks good, is easy to apply, and cures in seconds. Caution - wear glasses or sunglasses or safety-glasses when you use the pen-light - those LEDs emit more UV than you can see and your eyes should be shielded.
A regular craft glue would work too, just a bit messier.
 and 3D printed planets still in the bag.")
Everything ready for assembly! Acrylic rods, laser-cut acrylic display stand parts (covered by brown protective sheet) and 3D printed planets still in the bag.
Tools are scissors, super-glue, and side cutters. It turned out I didn't need the craft-knife or pencil sharpener. (I was going to use the sharpener to sharpen one end of the rods so I could get them into the display stand, but it was quicker and easier to just cut them to a point with the scissors.)